Introduction
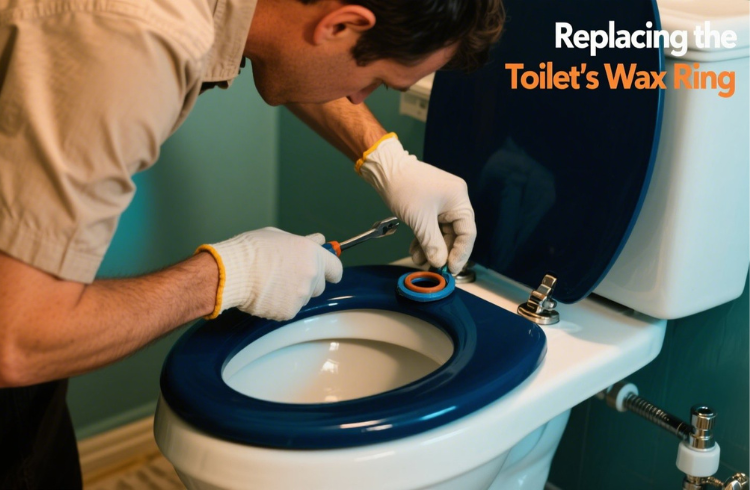
Replacing the toilet’s wax ring is a crucial task that many homeowners may face at some point. This wax ring serves as a seal between the toilet base and the flange on the floor, preventing leaks and ensuring a proper connection.
If you notice water pooling around the base of your toilet or if you hear unusual sounds when flushing, it may be time to replace this essential component. Whether you’re dealing with a leaking toilet base or simply performing a bathroom renovation, replacing the toilet’s wax ring is a critical maintenance task that ensures a watertight and odor-free seal between your toilet and the drain pipe.
In this guide, we will walk you through the tools, techniques, and troubleshooting tips needed to replace the toilet’s wax ring like a pro.
| Category | Details |
| Purpose of Wax Ring | Creates a watertight and airtight seal between the toilet base and floor flange to prevent leaks and sewer gases. |
| Signs You Need to Replace | Water leaking at base, bad odor, loose toilet, spongy floor. |
| Tools Needed | Adjustable wrench, screwdriver, putty knife, bucket, rags, gloves, new wax ring, replacement bolts, toilet shims (if needed). |
| Estimated Time | 1–2 hours (including clean-up). |
| Skill Level | Beginner to intermediate DIY. |
| Step-by-Step Summary | 1. Shut off water and drain toilet. 2. Disconnect and lift toilet. 3. Remove old wax ring. 4. Install new ring. 5. Reset toilet. |
| Common Mistakes | Not removing all old wax, using wrong size ring, overtightening bolts, not leveling toilet. |
| Troubleshooting Tips | If leaking persists: check flange height/damage; use flange extender or thicker ring; shim toilet if unstable. |
| Alternatives | Wax-free rings (e.g., rubber/sponge seals), which are reusable, cleaner, and more beginner-friendly. |
| When to Call a Plumber | Persistent leaks, flange damage, visible mold/rot, cracked toilet. |
| Maintenance Advice | Check bolts yearly, avoid rocking toilet, re-seal if signs of wear return. |
What is a Wax Ring?
A wax ring is a circular piece of wax that sits between the toilet and the floor flange, sealing the gap to prevent leaks and odors from escaping. Over time, the wax can degrade, leading to potential problems such as water damage and unpleasant smells.
Signs That You Need to Replace the Wax Ring
Here are some common signs that indicate it’s time to replace the wax ring:
- Water Pooling: If you notice water around the base of the toilet, this may indicate a failing wax ring.
- Unpleasant Odors: Foul smells can signify that the seal is broken, allowing sewer gases to escape.
- Rocking Toilet: If the toilet feels loose or wobbly, the wax ring may not be providing a secure seal.
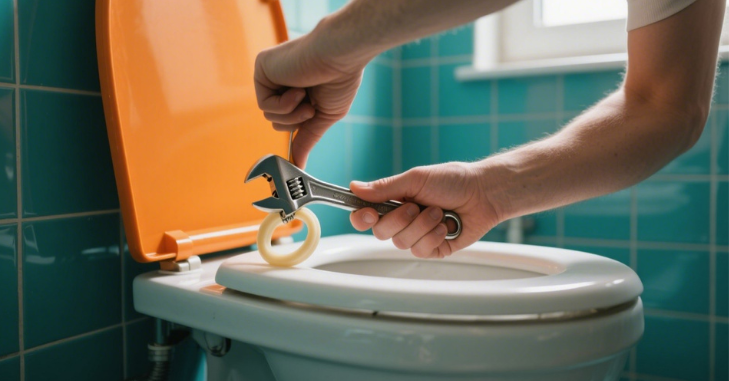
Tools Needed for Replacing the Toilet’s Wax Ring
Before you start the replacement process, gather the necessary tools and materials. Here’s a comprehensive list:
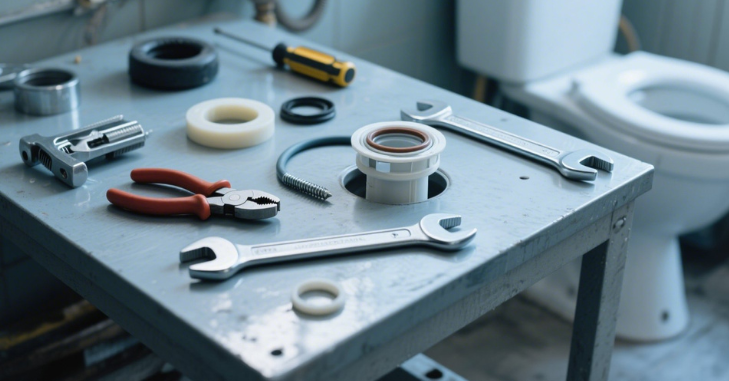
| Tool/Material | Purpose |
| Wrench | To remove the toilet bolts |
| Putty Knife | To scrape off the old wax ring |
| New Wax Ring | To create a new seal between the toilet and flange |
| Rubber Gloves | To keep your hands clean during the process |
| Bucket | To catch any residual water |
| Towel or Rags | For cleaning up spills |
| Level | To ensure the toilet is seated properly |
Choosing the Right Wax Ring for Your Toilet
Not all wax rings are created equal, and selecting the correct type can make a big difference in performance and ease of installation. Wax rings come in standard thickness, extra-thick, and even reinforced versions with a built-in flange.
Extra-thick or reinforced rings are especially useful for toilets that sit higher than the flange or for older homes where the floor may be uneven. Additionally, some wax rings are designed with plastic or rubber centers that provide extra stability and reduce the risk of leaks. Taking the time to match the wax ring to your toilet type and floor setup ensures a secure, long-lasting seal and minimizes the likelihood of having to redo the installation.
Step-by-Step Guide to Replacing the Toilet’s Wax Ring
Step 1: Gather Your Tools
Make sure you have all the necessary tools and materials on hand before starting your project. This will save you time and frustration during the process.
Step 2: Shut Off the Water Supply
Locate the water supply valve behind the toilet and turn it off. Flush the toilet to drain the tank, then use a sponge or towel to soak up any remaining water in the tank and bowl.
Step 3: Remove the Toilet
- Disconnect the Water Supply Line: Use a wrench to disconnect the water supply line from the tank.
- Unscrew the Toilet Bolts: Remove the caps covering the bolts at the base of the toilet. Use a wrench to unscrew the nuts and lift the toilet straight up off the flange. Set it aside on a towel or blanket to protect the floor.
Step 4: Remove the Old Wax Ring
Using a putty knife, carefully scrape off the old wax ring from the base of the toilet and the flange. Be sure to clean both surfaces thoroughly to ensure a good seal for the new wax ring.
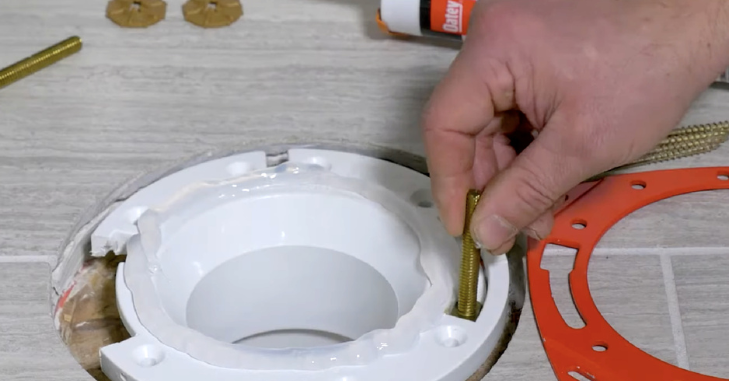
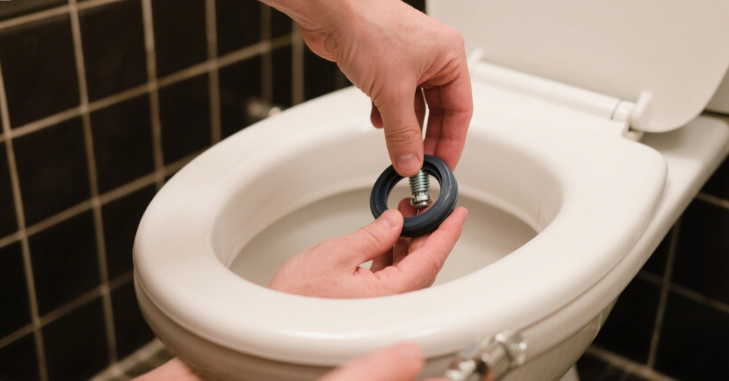
Step 5: Install the New Wax Ring
- Position the New Wax Ring: Place the new wax ring onto the flange, ensuring it is centered. Some prefer to place the wax ring on the toilet base instead.
- Set the Toilet: Carefully lower the toilet back onto the flange, aligning the bolts with the holes in the toilet base. Apply even pressure to ensure the wax ring compresses properly.
Step 6: Secure the Toilet
- Tighten the Bolts: Hand-tighten the nuts onto the bolts. Do not overtighten, as this can crack the toilet base.
- Check for Level: Use a level to ensure the toilet is sitting evenly. Adjust as necessary.
Step 7: Reconnect the Water Supply
Reattach the water supply line to the tank and turn the water supply back on. Allow the tank to fill, then flush the toilet to check for leaks around the base.
Step 8: Final Checks
Inspect the area around the toilet for any signs of leakage. If everything looks good, replace the bolt caps and clean up any excess wax or debris.
Troubleshooting Tips
Common Issues and Solutions
- Leakage After Installation: If you notice water pooling again, check that the wax ring is properly seated and that the toilet is tight against the flange.
- Wobbling Toilet: Ensure that the toilet is level. If necessary, use shims to stabilize it before tightening the bolts completely.
- Persistent Odor: If odors continue after replacing the wax ring, there may be an issue with the flange or venting in your plumbing system.
Additional Considerations
- Flange Repair: If the flange is damaged or broken, you may need to replace or repair it before installing a new wax ring.
- Regular Maintenance: Regularly check for signs of leaks or damage to prolong the life of your toilet and plumbing.
Mastering the Art of Replacing the Toilet’s Wax Ring
When it comes to replacing the toilet’s wax ring, precision matters. Make sure the toilet is aligned over the bolts before lowering it onto the new ring. Wiggle the toilet gently to compress the wax and form a solid seal, but don’t overdo it—too much force can crack the flange.
Reattach and Secure the Toilet
Place washers and nuts on the closet bolts and tighten evenly. Alternate sides to prevent rocking. Avoid overtightening, which can crack the porcelain base.
Reconnect the Water Supply
Attach the supply line back to the toilet tank. Turn on the shutoff valve and let the tank refill. Flush the toilet and check for any leaks around the base.
Finishing Touches
- Caulk around the toilet base for a finished look (optional but recommended).
- Use toilet shims if needed to level the base.
- Dispose of the old wax ring properly and clean your workspace.
Alternatives to Traditional Wax Rings
In recent years, wax-free toilet rings have gained popularity. Made from rubber or foam, they’re reusable and less messy. Brands like Fluidmaster and Sani Seal offer reliable options that are easier to install for beginners.
Conclusion
Replacing the toilet’s wax ring may seem daunting, but with the right tools and techniques, you can do it like a pro. By following this comprehensive guide, you’ll ensure a proper seal that prevents leaks and maintains the integrity of your bathroom.
Whether you’re a seasoned DIYer or a first-timer, this project is achievable with patience and care. Remember to troubleshoot any issues that arise after installation, and enjoy the peace of mind that comes with a well-maintained toilet. Happy plumbing!
Apart from that, if you are interested to know about “Home Office Comfort: The Best Air Conditioner Setup for Quiet, Zoned Cooling” then visit our “Home Improvement” category.
FAQs
Call a plumber if you see signs of water damage, mold, a broken flange, or if you feel unsure during any step of the process.
Check if the flange is damaged, cracked, or too low. Also ensure the toilet is properly leveled and bolts are not overtightened or loose.
It’s not recommended to stack wax rings. Use a single thick wax ring or a flange extender instead for a better and longer-lasting seal.
Yes. If the flange sits below floor level, a thicker wax ring or a flange extender is often necessary to maintain a secure seal.